After discovering the Tank-cure F*ck-*p by the previous owner, i searched for ways to resolve. Many parts where available over at YAMBITS so i could rebuild the Fuelcap and Fuel tap also. Tank-cure could be stripped out with an specific stripper. How ever my tank was missing the emblems, which where (to) hard for me to source. And I learned that the original tap flowed to slow, Erlenbach racing explained how a YZ250 fuel tap flows better and prevents the carburetors from starvation. Also from an aesthetics point i wanted to change the Fuel-filler-cap.
So i sourced a second hand fuel tank (with little rust and with functioning balance lines). ( i acutaly had some luck! and via www.marktplaats.nl i was able to purchase a tank, Guiliary seat and previous mentioned carburetors) .
Fueltap
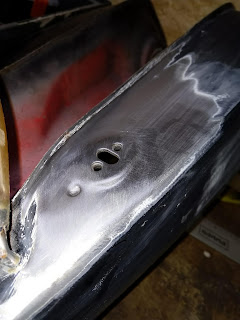
First step was to purchase the yz250 fuel tap, which is a direct swap to a coffin-style fuel tank. But this doesn't fit the nostalgic round tanks i owned. A plate with threaded bushings was brazed to the tank in order to make fit the new style fuel tap.
original mounting threads, with paint removed
Adapter-plate fabbed and trial fitting with the big fuel tap
With the unrestricted fuel-tap sorted, i de-rusted the inside of the tank wit chemical (i forgot which, but they turn rust into sulfate).
Fuel-cap
I now shifted my attention to making and redesigning the filler cap. As i wanted to do a 70's-racing inspired build. I looked at Allan millyards Honda CR375 fuel cap and a couple of TZ ones.
Starting with the original cap
A piece of billet aluminium, a piece of paper and under estimating the effort needed
Machining the inside to fit the original vent and seal system
Drilling an hack-sawing away the exces material
Filing away, until the shape has been found
So after 4 month's of working on the lathe and filing, it looked and worked like this! I'm so proud that i envisioned this and kept going.
Seat
I liked the look of the Giuliari-seat that came with the bike. Especially the "patina" or marks of age it showed. So i was happy that i could source a second one. I had some wild idea's at the start of the project about fitting an TZ-seat. But that's hard to pull-off if you don't want to cut your frame. The aim for this sear was to bring in the bottom line off the tank, an make it look level. so strips of 1mm plate are added. also it had to be straightened extensively. After the metal work was done, i shipped it to miller-upholstery to get a fresh cover of diamond stitched and branded fake-leather.
As purchased, there is a small break in the line from the tank bottom to the seat bottom
Looking for lines
Fitting with paper templates
Metal work finished and painted
Miller's work all-done and looking sharp
Removing the emblems
So since the original emblems are hard to find, an me wanting a 1970s'-racing style (some wat TZ inspired) The dents for the emblems needed to go. The tank i bought, had them filled with bondo, and it showed some nice signs of cracking. By far not nice enough. So when i shipped all the parts to the spray-painter (different story - other time), the dents for the logo's where filled with sheetmetal to prevent cracking.
Tank with logo mounts and dents in place
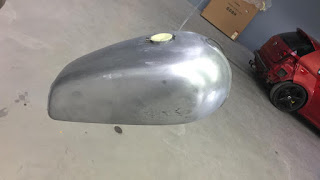
Tank logo area - detabbed
Filled with sheet metal
The sanded down logo area, ready to receive primer and bondo before getting blocked out by sanding.